
Java Loops - for, while and do...while
There may be a situation when we need to execute a block of code several number of times, and is often referred to as a loop.
Java has very flexible three looping mechanisms. You can use one of the following three loops:
- while Loop
- do...while Loop
- for Loop
As of Java 5, the enhanced for loop was introduced. This is mainly used for Arrays.
The while Loop:
A while loop is a control structure that allows you to repeat a task a certain number of times.
Syntax:
The syntax of a while loop is:
while(Boolean_expression)
{
   //Statements
}
When executing, if the boolean_expression result is true, then the actions inside the loop will be executed. This will continue as long as the expression result is true.
Here, key point of the while loop is that the loop might not ever run. When the expression is tested and the result is false, the loop body will be skipped and the first statement after the while loop will be executed.
Example:
public class Test {

   public static void main(String args[]) {
      int x = 10;

      while( x < 20 ) {
         System.out.print("value of x : " + x );
         x++;
         System.out.print("\n");
      }
   }
}
This would produce the following result:
value of x : 10
value of x : 11
value of x : 12
value of x : 13
value of x : 14
value of x : 15
value of x : 16
value of x : 17
value of x : 18
value of x : 19
The do...while Loop:
A do...while loop is similar to a while loop, except that a do...while loop is guaranteed to execute at least one time.
Syntax:
The syntax of a do...while loop is:
do
{
   //Statements
}while(Boolean_expression);
Notice that the Boolean expression appears at the end of the loop, so the statements in the loop execute once before the Boolean is tested.
If the Boolean expression is true, the flow of control jumps back up to do, and the statements in the loop execute again. This process repeats until the Boolean expression is false.
Example:
public class Test {

   public static void main(String args[]){
      int x = 10;

      do{
         System.out.print("value of x : " + x );
         x++;
         System.out.print("\n");
      }while( x < 20 );
   }
}
This would produce the following result:
value of x : 10
value of x : 11
value of x : 12
value of x : 13
value of x : 14
value of x : 15
value of x : 16
value of x : 17
value of x : 18
value of x : 19
The for Loop:
A for loop is a repetition control structure that allows you to efficiently write a loop that needs to execute a specific number of times.
A for loop is useful when you know how many times a task is to be repeated.
Syntax:
The syntax of a for loop is:
for(initialization; Boolean_expression; update)
{
   //Statements
}
Here is the flow of control in a for loop:
- The initialization step is executed first, and only once. This step allows you to declare and initialize any loop control variables. You are not required to put a statement here, as long as a semicolon appears.
- Next, the Boolean expression is evaluated. If it is true, the body of the loop is executed. If it is false, the body of the loop does not execute and flow of control jumps to the next statement past the for loop.
- After the body of the for loop executes, the flow of control jumps back up to the update statement. This statement allows you to update any loop control variables. This statement can be left blank, as long as a semicolon appears after the Boolean expression.
- The Boolean expression is now evaluated again. If it is true, the loop executes and the process repeats itself (body of loop, then update step, then Boolean expression). After the Boolean expression is false, the for loop terminates.
Example:
public class Test {

   public static void main(String args[]) {

      for(int x = 10; x < 20; x = x+1) {
         System.out.print("value of x : " + x );
         System.out.print("\n");
      }
   }
}
This would produce the following result:
value of x : 10
value of x : 11
value of x : 12
value of x : 13
value of x : 14
value of x : 15
value of x : 16
value of x : 17
value of x : 18
value of x : 19
Enhanced for loop in Java:
As of Java 5, the enhanced for loop was introduced. This is mainly used for Arrays.
Syntax:
The syntax of enhanced for loop is:
for(declaration : expression)
{
   //Statements
}
- Declaration: The newly declared block variable, which is of a type compatible with the elements of the array you are accessing. The variable will be available within the for block and its value would be the same as the current array element.
- Expression: This evaluates to the array you need to loop through. The expression can be an array variable or method call that returns an array.
Example:
public class Test {

   public static void main(String args[]){
      int [] numbers = {10, 20, 30, 40, 50};

      for(int x : numbers ){
         System.out.print( x );
         System.out.print(",");
      }
      System.out.print("\n");
      String [] names ={"James", "Larry", "Tom", "Lacy"};
      for( String name : names ) {
         System.out.print( name );
         System.out.print(",");
      }
   }
}
This would produce the following result:
10,20,30,40,50,
James,Larry,Tom,Lacy,
The break Keyword:
The break keyword is used to stop the entire loop. The break keyword must be used inside any loop or a switch statement.
The break keyword will stop the execution of the innermost loop and start executing the next line of code after the block.
Syntax:
The syntax of a break is a single statement inside any loop:
break;
Example:
public class Test {

   public static void main(String args[]) {
      int [] numbers = {10, 20, 30, 40, 50};

      for(int x : numbers ) {
         if( x == 30 ) {
       break;
         }
         System.out.print( x );
         System.out.print("\n");
      }
   }
}
This would produce the following result:
10
20
The continue Keyword:
The continue keyword can be used in any of the loop control structures. It causes the loop to immediately jump to the next iteration of the loop.
- In a for loop, the continue keyword causes flow of control to immediately jump to the update statement.
- In a while loop or do/while loop, flow of control immediately jumps to the Boolean expression.
Syntax:
The syntax of a continue is a single statement inside any loop:
continue;
Example:
public class Test {

   public static void main(String args[]) {
      int [] numbers = {10, 20, 30, 40, 50};

      for(int x : numbers ) {
         if( x == 30 ) {
       continue;
         }
         System.out.print( x );
         System.out.print("\n");
      }
   }
}
This would produce the following result:
10
20
40
50
Java Decision Making
There are two types of decision making statements in Java. They are:
-
if statements
-
switch statements
The if Statement:
An if statement consists of a Boolean expression followed by one or more statements.
Syntax:
The syntax of an if statement is:
if(Boolean_expression)
{
//Statements will execute if the Boolean expression is true
}
If the Boolean expression evaluates to true then the block of code inside the if statement will be executed. If not the first set of code after the end of the if statement (after the closing curly brace) will be executed.
Example:
public class Test {
public static void main(String args[]){
int x = 10;
if( x < 20 ){
System.out.print("This is if statement");
}
}
}
This would produce the following result:
This is if statement
The if...else Statement:
An if statement can be followed by an optional else statement, which executes when the Boolean expression is false.
Syntax:
The syntax of an if...else is:
if(Boolean_expression){
//Executes when the Boolean expression is true
}else{
//Executes when the Boolean expression is false
}
Example:
public class Test {
public static void main(String args[]){
int x = 30;
if( x < 20 ){
System.out.print("This is if statement");
}else{
System.out.print("This is else statement");
}
}
}
This would produce the following result:
This is else statement
The if...else if...else Statement:
An if statement can be followed by an optional else if...else statement, which is very useful to test various conditions using single if...else if statement.
When using if , else if , else statements there are few points to keep in mind.
-
An if can have zero or one else's and it must come after any else if's.
-
An if can have zero to many else if's and they must come before the else.
-
Once an else if succeeds, none of the remaining else if's or else's will be tested.
Syntax:
The syntax of an if...else is:
if(Boolean_expression 1){
//Executes when the Boolean expression 1 is true
}else if(Boolean_expression 2){
//Executes when the Boolean expression 2 is true
}else if(Boolean_expression 3){
//Executes when the Boolean expression 3 is true
}else {
//Executes when the none of the above condition is true.
}
Example:
public class Test {
public static void main(String args[]){
int x = 30;
if( x == 10 ){
System.out.print("Value of X is 10");
}else if( x == 20 ){
System.out.print("Value of X is 20");
}else if( x == 30 ){
System.out.print("Value of X is 30");
}else{
System.out.print("This is else statement");
}
}
}
This would produce the following result:
Value of X is 30
Nested if...else Statement:
It is always legal to nest if-else statements which means you can use one if or else if statement inside another if or else if statement.
Syntax:
The syntax for a nested if...else is as follows:
if(Boolean_expression 1){
//Executes when the Boolean expression 1 is true
if(Boolean_expression 2){
//Executes when the Boolean expression 2 is true
}
}
You can nest else if...else in the similar way as we have nested if statement.
Example:
public class Test {
public static void main(String args[]){
int x = 30;
int y = 10;
if( x == 30 ){
if( y == 10 ){
System.out.print("X = 30 and Y = 10");
}
}
}
}
This would produce the following result:
X = 30 and Y = 10
The switch Statement:
A switch statement allows a variable to be tested for equality against a list of values. Each value is called a case, and the variable being switched on is checked for each case.
Syntax:
The syntax of enhanced for loop is:
switch(expression){
case value :
//Statements
break; //optional
case value :
//Statements
break; //optional
//You can have any number of case statements.
default : //Optional
//Statements
}
The following rules apply to a switch statement:
-
The variable used in a switch statement can only be a byte, short, int, or char.
-
You can have any number of case statements within a switch. Each case is followed by the value to be compared to and a colon.
-
The value for a case must be the same data type as the variable in the switch and it must be a constant or a literal.
-
When the variable being switched on is equal to a case, the statements following that case will execute until a break statement is reached.
-
When a break statement is reached, the switch terminates, and the flow of control jumps to the next line following the switch statement.
-
Not every case needs to contain a break. If no break appears, the flow of control will fall throughto subsequent cases until a break is reached.
-
A switch statement can have an optional default case, which must appear at the end of the switch. The default case can be used for performing a task when none of the cases is true. No break is needed in the default case.
Example:
public class Test {
public static void main(String args[]){
//char grade = args[0].charAt(0);
char grade = 'C';
switch(grade)
{
case 'A' :
System.out.println("Excellent!");
break;
case 'B' :
case 'C' :
System.out.println("Well done");
break;
case 'D' :
System.out.println("You passed");
case 'F' :
System.out.println("Better try again");
break;
default :
System.out.println("Invalid grade");
}
System.out.println("Your grade is " + grade);
}
}
Compile and run above program using various command line arguments. This would produce the following result:
$ java Test
Well done
Your grade is a C
$
Java - Numbers Class
Normally, when we work with Numbers, we use primitive data types such as byte, int, long, double, etc.
Example:
int i = 5000;
float gpa = 13.65;
byte mask = 0xaf;
However, in development, we come across situations where we need to use objects instead of primitive data types. In-order to achieve this Java provides wrapper classes for each primitive data type.
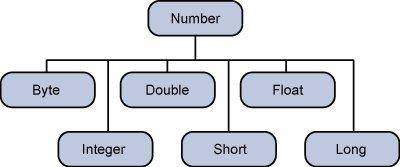
All the wrapper classes (Integer, Long, Byte, Double, Float, Short) are subclasses of the abstract class Number.
This wrapping is taken care of by the compiler, the process is called boxing. So when a primitive is used when an object is required, the compiler boxes the primitive type in its wrapper class. Similarly, the compiler unboxes the object to a primitive as well. The Number is part of the java.lang package.
Here is an example of boxing and unboxing:
public class Test{
public static void main(String args[]){
Integer x = 5; // boxes int to an Integer object
x = x + 10; // unboxes the Integer to a int
System.out.println(x);
}
}
This would produce the following result:
15
When x is assigned integer values, the compiler boxes the integer because x is integer objects. Later, x is unboxed so that they can be added as integers.
Number Methods:
Here is the list of the instance methods that all the subclasses of the Number class implement:
SN Methods with Description 1 xxxValue()
Converts the value of this Number object to the xxx data type and returned it. 2 compareTo()
Compares this Number object to the argument. 3 equals()
Determines whether this number object is equal to the argument. 4 valueOf()
Returns an Integer object holding the value of the specified primitive. 5 toString()
Returns a String object representing the value of specified int or Integer. 6 parseInt()
This method is used to get the primitive data type of a certain String. 7 abs()
Returns the absolute value of the argument. 8 ceil()
Returns the smallest integer that is greater than or equal to the argument. Returned as a double. 9 floor()
Returns the largest integer that is less than or equal to the argument. Returned as a double. 10 rint()
Returns the integer that is closest in value to the argument. Returned as a double. 11 round()
Returns the closest long or int, as indicated by the method's return type, to the argument. 12 min()
Returns the smaller of the two arguments. 13 max()
Returns the larger of the two arguments. 14 exp()
Returns the base of the natural logarithms, e, to the power of the argument. 15 log()
Returns the natural logarithm of the argument. 16 pow()
Returns the value of the first argument raised to the power of the second argument. 17 sqrt()
Returns the square root of the argument. 18 sin()
Returns the sine of the specified double value. 19 cos()
Returns the cosine of the specified double value. 20 tan()
Returns the tangent of the specified double value. 21 asin()
Returns the arcsine of the specified double value. 22 acos()
Returns the arccosine of the specified double value. 23 atan()
Returns the arctangent of the specified double value. 24 atan2()
Converts rectangular coordinates (x, y) to polar coordinate (r, theta) and returns theta. 25 toDegrees()
Converts the argument to degrees 26 toRadians()
Converts the argument to radians. 27 random()
Returns a random number.
No comments:
Post a Comment